System Overview
![]()
This section will walk through how we build new environments or simulations from scratch. Let’s get familiar with the project first
Project Structure
The project structure is as follows:
documentation: It contains files building this documentation
metaurban: the metaurban package, most content is in this directory
The metaurban package has the following structure:
assets: it is downloaded from github releases automatically, containing models, textures, and mini-batch real-world scenarios
assets_pedestrain: it is downloaded from github releases automatically, containing 3D assets of pedestrians
base_class: meta-classes for making other python classes, usually you don’t need to modify it
component: objects/vehicles/maps/lanes/building, almost all elements used for constructing scenario is here
engine: it contains code regarding the simulation loop, top-down renderer, asset manager/loader, physics system, logger, skybox, shadow, and so on
envs: a collection of gym-style environments
examples: runnable scripts for making yourself familiar with MetaUrban
manager: managers that defines how to create/forward scene are stored here
obs: a collection of observations that define how to collect information from the simulator in each step
policy: a collection of policies that define how an object should act in each step
render_pipeline: it contains the deferred rendering pipeline, which is developed by tobspr
scenario: it defines the universal scenario format and a set of tools to read data from the format, like parsing object state
shaders: .glsl shaders for making skybox, terrain, depth camera and so on
tests: unitest are located here, which can be viewed as examples as well
third_party: libraries developed by others
utils: various tool functions
constants.py: it defines constants and some properties used everywhere
type.py: all objects have a type label, which is selected from here
pull_asset: scripts to pull or update asset from the remote git release page
Start point-BaseEnv
To start making your own environment, the first step is to have something runnable so you can build things on top of it.
This can be done with BaseEnv, which is an empty environment with only a vehicle placed in this environment.
So just make a new your_env.py file and put the following code into it.
Note: we usually use 3D renderer to do development as it shows more details, but using 2D visualizer is allowed as well. In this doc, we use 2D renderer for convinience.
If you have a screen with OpenGL support, you can completely remove the env.render and env.top_down_renderer.generate_gif. If OpenGL is not supported on your machine but a screen is still available, just turn off the screen_record and set window=True for top_down_renderer and remove env.top_down_renderer.generate_gif. Otherwise, just keep everying unchanged. Without a screen, the only way to visualize the environment is through generating GIFs.
from metaurban.envs.base_env import BaseEnv
from metaurban.obs.observation_base import DummyObservation
import logging

class MyEnv(BaseEnv):

    def reward_function(self, agent):
        return 0, {}

    def cost_function(self, agent):
        return 0, {}

    def done_function(self, agent):
        return False, {}

    def get_single_observation(self):
        return DummyObservation()


if __name__=="__main__":
    # create env
    env=MyEnv(dict(use_render=False, # if you have a screen and OpenGL suppor, you can set use_render=True to use 3D rendering
                   manual_control=True, # we usually manually control the car to test environment
                   log_level=logging.CRITICAL)) # suppress logging message
    env.reset()
    for i in range(20):

        # step
        obs, reward, termination, truncate, info = env.step(env.action_space.sample())

        # you can set window=True and remove generate_gif() if you have a screen.
        # Or just use 3D rendering and remove all stuff related to env.render()
        frame=env.render(mode="topdown",
                         window=False, # turn me on, if you have screen
                         screen_record=True, # turn me off, if a window can be poped up
                         screen_size=(200, 200))
    env.top_down_renderer.generate_gif()
    env.close()

from IPython.display import Image
Image(open("demo.gif", 'rb').read())

As shown in the figure above, this environment contains nothing. We will make it complete gradually.
Firstly, let’s add a map to the environment to make it a bit interesting.
Also, when we develop a new environment, developing map and map management module is the first step we do. This is because map is the most important component associated with a lot of things like observation and navigation. Thus, the map has to be created in a scene firstly and the map management module map_manager should have the highest priority.
MapManager
Compared to the last code cell, we add a map manager to generate different maps for each seed. Concretely, there are three maps and we choose from the three maps according to the global seed by map_id = global_seed % 3. New content added upon the last code cell are marked between two ======.
from metaurban.envs.base_env import BaseEnv
from metaurban.obs.observation_base import DummyObservation
import logging

# ======================================== new content ===============================================
import cv2
from metaurban.component.map.pg_map import PGMap
from metaurban.manager.base_manager import BaseManager
from metaurban.component.pgblock.first_block import FirstPGBlock

class MyMapManager(BaseManager):
    PRIORITY = 0

    def __init__(self):
        super(MyMapManager, self).__init__()
        self.current_map = None
        self.all_maps = {idx: None for idx in range(3)} # store the created map
        self._map_shape = ["X", "T", "O"] # three types of maps

    def reset(self):
        idx = self.engine.global_random_seed % 3
        if self.all_maps[idx] is None:
            # create maps on the fly
            new_map = PGMap(map_config=dict(type=PGMap.BLOCK_SEQUENCE,
                                            config=self._map_shape[idx]))
            self.all_maps[idx] = new_map

        # attach map in the world
        map = self.all_maps[idx]
        map.attach_to_world()
        self.current_map = map
        return dict(current_map=self._map_shape[idx])

    def before_reset(self):
        if self.current_map is not None:
            self.current_map.detach_from_world()
            self.current_map = None

    def destroy(self):
        # clear all maps when this manager is destroyed
        super(MyMapManager, self).destroy()
        for map in self.all_maps.values():
            if map is not None:
                map.destroy()
        self.all_maps = None


# Expand the default config system, specify where to spawn the car
MY_CONFIG = dict(agent_configs={"default_agent": dict(spawn_lane_index=(FirstPGBlock.NODE_1, FirstPGBlock.NODE_2, 0))})


class MyEnv(BaseEnv):

    @classmethod
    def default_config(cls):
        config = super(MyEnv, cls).default_config()
        config.update(MY_CONFIG)
        return config

    def setup_engine(self):
        super(MyEnv, self).setup_engine()
        self.engine.register_manager("map_manager", MyMapManager())

# ======================================== new content ===============================================

    def reward_function(self, agent):
        return 0, {}

    def cost_function(self, agent):
        return 0, {}

    def done_function(self, agent):
        return False, {}

    def get_single_observation(self):
        return DummyObservation()


if __name__=="__main__":
    frames = []

    # create env
    env=MyEnv(dict(crswalk_density=1.,
                   use_render=False, # if you have a screen and OpenGL suppor, you can set use_render=True to use 3D rendering
                   manual_control=True, # we usually manually control the car to test environment
                   num_scenarios=4,
                   log_level=logging.CRITICAL)) # suppress logging message
    for i in range(4):

        # reset
        o, info = env.reset(seed=i)
        print("Load map with shape: {}".format(info["current_map"]))
        # you can set window=True and remove generate_gif() if you have a screen.
        # Or just use 3D rendering and remove all stuff related to env.render()
        frame=env.render(mode="topdown",
                         window=False, # turn me on, if you have screen
                         scaling=3,
                         camera_position=(50, 0),
                         screen_size=(400, 400))
        frames.append(frame)
    cv2.imwrite("demo.png",  cv2.cvtColor(cv2.hconcat(frames), cv2.COLOR_RGB2BGR))
    env.close()

from IPython.display import Image
Image(open("demo.png", 'rb').read())
Load map with shape: X
Load map with shape: T
Load map with shape: O
Load map with shape: X

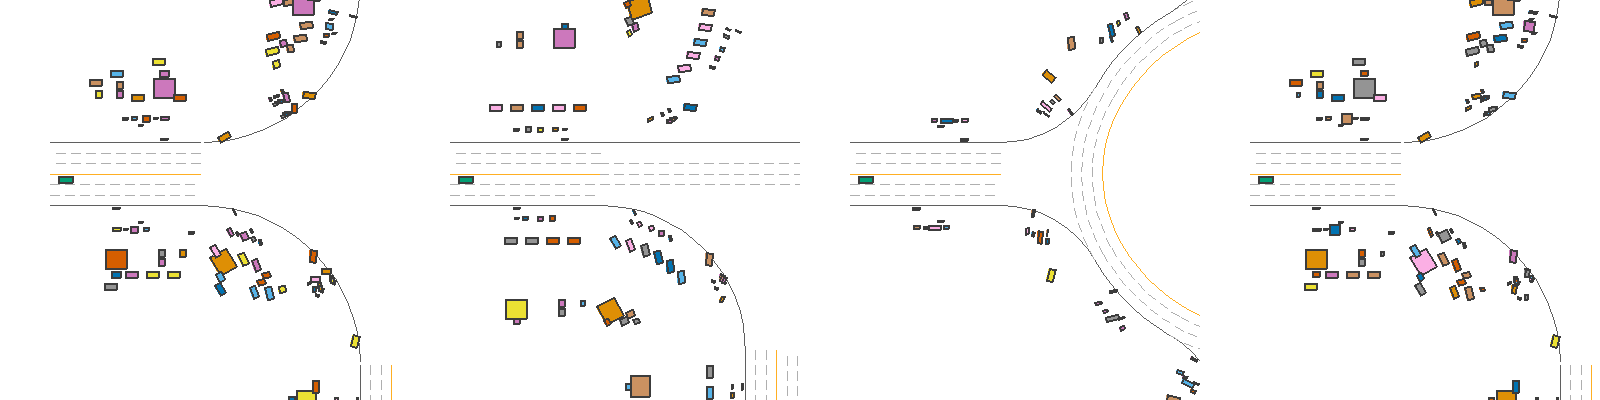
The results show 4 scenarios and the 4th scenario is the same as the first one, as we repeatedly load the 3 maps according to MyMapManager.reset().
This function also returns the shape of the current map, which you can access in the info returned by env.step().
Thus, in your own development, you can collect simulation information and return them by env.step() by returning a dictionary in these functions: before_step, step, after_step, before_reset, reset, after_reset.
Another thing to take care of is that we overwrite the original agent_configs of BaseEnv.
It defines where to spawn the agent with the id default_agent.
You can create maps automatically with PGMap which combines some predefined blocks.
AssetManager
Compared to the last code cell, we add a asset manager to generate different objects on sidewalk for each seed. New content added upon the last code cell are marked between two ======.
from metaurban.envs.base_env import BaseEnv
from metaurban.obs.observation_base import DummyObservation
import logging

# ======================================== new content ===============================================
import cv2
from metaurban.manager.sidewalk_manager import AssetManager

class MyAssetManager(AssetManager):
    PRIORITY = 9

    def __init__(self):
        super(MyAssetManager, self).__init__()


    def reset(self):
        super(MyAssetManager, self).reset()

# Expand the default config system, specify where to spawn the car
MY_CONFIG = dict(agent_configs={"default_agent": dict(spawn_lane_index=(FirstPGBlock.NODE_1, FirstPGBlock.NODE_2, 0))}, object_density=0.3)

class MyEnv(BaseEnv):

    @classmethod
    def default_config(cls):
        config = super(MyEnv, cls).default_config()
        config.update(MY_CONFIG)
        return config

    def setup_engine(self):
        super(MyEnv, self).setup_engine()
        self.engine.register_manager("map_manager", MyMapManager())
        self.engine.register_manager("asset_manager", MyAssetManager())

# ======================================== new content ===============================================

    def reward_function(self, agent):
        return 0, {}

    def cost_function(self, agent):
        return 0, {}

    def done_function(self, agent):
        return False, {}

    def get_single_observation(self):
        return DummyObservation()


if __name__=="__main__":
    frames = []

    # create env
    env=MyEnv(dict(crswalk_density=1.,
                   use_render=False, # if you have a screen and OpenGL suppor, you can set use_render=True to use 3D rendering
                   manual_control=True, # we usually manually control the car to test environment
                   num_scenarios=4)) # suppress logging message
    for i in range(4):

        # reset
        o, info = env.reset(seed=i)
        # you can set window=True and remove generate_gif() if you have a screen.
        # Or just use 3D rendering and remove all stuff related to env.render()
        frame=env.render(mode="topdown",
                         window=False, # turn me on, if you have screen
                         scaling=3,
                         camera_position=(50, 0),
                         screen_size=(400, 400))
        frames.append(frame)
    cv2.imwrite("demo.png",  cv2.cvtColor(cv2.hconcat(frames), cv2.COLOR_RGB2BGR))
    env.close()

from IPython.display import Image
Image(open("demo.png", 'rb').read())
[INFO] Environment: MyEnv
[INFO] MetaUrban version: 0.0.1
[INFO] Sensors: [lidar: Lidar(), side_detector: SideDetector(), lane_line_detector: LaneLineDetector()]
[INFO] Render Mode: none
[INFO] Horizon (Max steps per agent): None
[WARNING] You are using DummyObservation which doesn't collect information from the environment. (observation_base.py:50)
[INFO] Assets version: 0.0.1
[INFO] Known Pipes: glxGraphicsPipe
[WARNING] Can not find `start_seed` or `start_scenario_index`. Use 0 as `start_seed` (base_engine.py:577)
[INFO] Start Scenario Index: 0, Num Scenarios : 4
[WARNING] Can not find `start_seed` or `start_scenario_index`. Use 0 as `start_seed` (base_engine.py:577)
[WARNING] Can not find `start_seed` or `start_scenario_index`. Use 0 as `start_seed` (base_engine.py:577)
[WARNING] Can not find `start_seed` or `start_scenario_index`. Use 0 as `start_seed` (base_engine.py:577)
[WARNING] Can not find `start_seed` or `start_scenario_index`. Use 0 as `start_seed` (base_engine.py:577)